13.5 开发用户中心页面
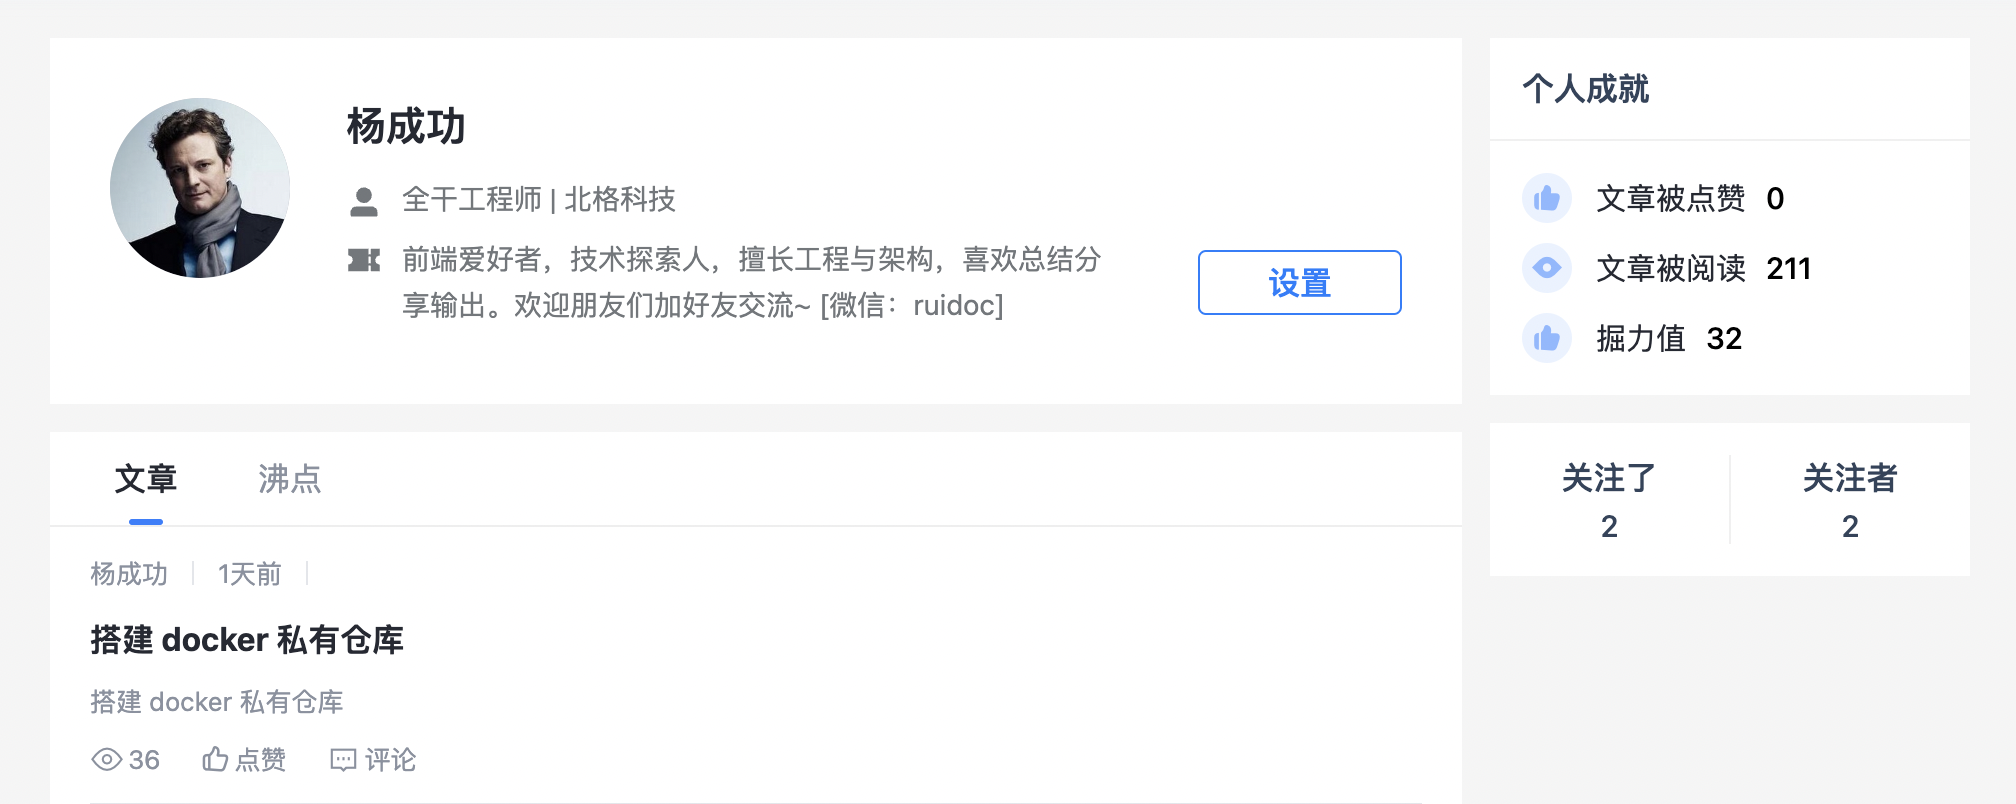
点击头部组件中的用户名和头像、或文章详情页的用户名和头像,就会进入到用户详情页面。用户详情页 URL 中携带用户 ID,页面中展示用户基本信息,用户已经发布的文章、沸点等资源。
(1)创建文件 views/user/index.vue 表示用户中心页,并添加一条路由配置如下:
js
// router/routes.ts
{
  path: '/user/:id',
  name: 'user',
  component: () => import('@/views/user/index.vue'),
},
(2)按照左右布局结构编写组件的模版代码,展示当前用户的基本信息和个人成就。
首先是左侧的个人信息部分,模版代码如下:
html
<div class="content-panel">
  <div class="basic fx panel" v-if="curuser">
    <el-avatar :size="90">
      <img src="@/assets/avatar.png" />
    </el-avatar>
    <div class="uinfo-wrap">
      <div class="row-name">
        <h2>{{ curuser.username }}</h2>
      </div>
      <div class="row-intro">
        <span class="fx">
          <el-icon :size="18"><UserFilled /></el-icon>
          <span>
            {{ curuser.position || '程序员' }} | {{ curuser.company || '某厂' }}
          </span>
        </span>
      </div>
      <div class="row-intro fx-b">
        <span class="fxt">
          <el-icon :size="18"><Ticket /></el-icon>
          <span class="intro">{{ curuser.introduc }}</span>
        </span>
        <span class="edit-btn">编辑个人资料</span>
      </div>
    </div>
  </div>
</div>
右侧展示个人成就包括点赞量、掘力值等,模版代码如下:
html
<div class="other-panel" v-if="curuser">
  <div class="achieve panel">
    <h3 class="achi-title">个人成就</h3>
    <div class="achi-body">
      <div class="row fx">
        <span class="icarea">
          <span class="iconfont icon-zan2 izan" />
        </span>
        <span>文章被点赞<span class="n">{{ curuser.good_num }}</span></span>
      </div>
      <div class="row fx">
        <span class="icarea">
          <span class="iconfont icon-view2" />
        </span>
        <span>文章被阅读<span class="n">{{ curuser.read_num }}</span></span>
      </div>
      <div class="row fx">
        <span class="icarea">
          <span class="iconfont icon-zan2 izan" />
        </span>
        <span>掘力值<span class="n">{{ curuser.jue_power }}</span></span>
      </div>
    </div>
  </div>
</div>
(3)在 JS 代码中,从 URL 中获取用户 ID,然后查询当前用户信息并保存,代码如下:
vue
<script setup lang="ts">
import { userStore } from "@/stores";
import { Ticket, UserFilled } from "@element-plus/icons-vue";
import { onMounted, ref } from "vue";
import { useRoute } from "vue-router";
const { getUser } = userStore();
const route = useRoute();
const curuser = ref<UserType | null>(null);
const uid = ref(null);
onMounted(() => {
  let { id } = route.params;
  uid.value = id as string;
  getUser(uid.value, (res) => {
    curuser.value = res;
  });
});
</script>
经过以上的三个步骤,访问个人中心页时就可以看到用户的基本信息和数据了。
(4)添加一个 tab 切换组件分别展示当前用户的文章和沸点数据。这里文章和沸点列表可以复用之前编写的公共组件。模版代码如下:
html
<div class="datainfo panel">
  <div class="cus-tabs-header">
    <ul @click="onChange">
      <li data-val="article" :class="{ active: tab == 'article' }">文章</li>
      <li data-val="shortmsg" :class="{ active: tab == 'shortmsg' }">沸点</li>
    </ul>
  </div>
  <Articles v-if="tab == 'article'" :articles="articles.data" />
  <ShortMsgs v-if="tab == 'shortmsg'" :shortmsgs="short_msgs.data" />
</div>
(5)编写 tab 切换的 onChange() 方法;获取文章、沸点的列表数据并存储;导入公共文章和沸点列表组件。在 JS 中添加代码如下:
js
import { articleStore, shortmsgStore } from "@/stores";
import Articles from "@/views/article/lists.vue";
import ShortMsgs from "@/views/short-msg/lists.vue";
const { getArticles } = articleStore();
const { getShortmsgs } = shortmsgStore();
const tab = ref("article");
const articles = ref({
  meta: null,
  data: [],
});
const short_msgs = ref({
  meta: null,
  data: [],
});
const onChange = (e: MouseEvent) => {
  let dom: any = e.target;
  tab.value = dom.dataset.val;
  getData();
};
const getData = () => {
  if (tab.value == "article") {
    getArticles({ created_by: uid.value }, (res) => {
      articles.value = res;
    });
  }
  if (tab.value == "shortmsg") {
    getShortmsgs({ created_by: uid.value }, (res) => {
      short_msgs.value = res;
    });
  }
};
(6)添加组件的基本样式代码如下:
less
.user-page {
  width: 960px;
  margin: auto;
  align-items: flex-start;
  .content-panel {
    flex: 1;
    .uinfo-wrap {
      margin-left: 28px;
      flex: 1;
      .row-name {
        margin-bottom: 12px;
      }
      .row-intro {
        color: #72777b;
        font-size: 14px;
      }
    }
  }
  .other-panel {
    width: 240px;
    margin-left: 14px;
    .achieve {
      .achi-title {
        padding: 14px 16px;
        border-bottom: 1px solid #f0f0f0;
        font-size: 16px;
        color: #31445b;
      }
      .achi-body {
        padding: 11px 16px;
        .row {
          line-height: 35px;
        }
      }
    }
  }
  .panel {
    background: #fff;
    margin-bottom: 14px;
  }
}
最终的文章详情页面如图所示:
